


什么是 BeEF-XSS?
BeEF(Browser Exploitation Framework)是一个专业的渗透测试工具,专门用于对 Web 浏览器进行安全测试。它利用跨站脚本(XSS)漏洞劫持用户的浏览器,建立与目标浏览器的通信通道,从而进行各种安全测试和攻击模拟。
Kali NetHunter 与桌面版 Kali 的差异
在 Kali NetHunter(Android 环境)中运行 BeEF 会遇到一些特殊问题:
-
环境限制:Android 系统的权限和文件结构与 Linux 桌面版不同 -
依赖问题:某些 Ruby gem 包需要本地编译安装 -
网络配置:需要正确处理移动设备的网络接口
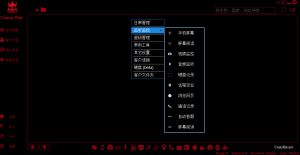
这是在kali Nethunter中启用beef-xss会出现一下情况,跟电脑版kali有所差异,如图:

![图片[2]-如何在Android手机的Termux-X FOR Kali NetHunter环境中安装BeEF-XSS并内网穿透-X黑手网](https://files.mdnice.com/user/122080/c6e40f9b-0e0f-4944-bffc-273335a863cb.png)
那么怎么办呢?
解决方案:手动编译安装
第一步:准备环境与获取源码
首先更新软件包并安装必要的编译工具和依赖:
# 更新软件源
apt update

# 安装基础编译工具和依赖
apt install -y git ruby ruby-dev build-essential libsqlite3-dev nodejs openssl make gcc pkg-config

# 安装 bundler
gem install bundler
![图片[3]-如何在Android手机的Termux-X FOR Kali NetHunter环境中安装BeEF-XSS并内网穿透-X黑手网](https://files.mdnice.com/user/122080/1064ba82-c37a-4437-bdaa-0da3d314957c.png)

第二步:手动下载并安装必要的 Ruby gem 包
由于网络问题和依赖关系,我们需要手动下载并安装 gem 包:
# 下载必要的 gem 包
wget https://rubygems.org/downloads/erubis-2.7.0.gem
wget https://rubygems.org/downloads/domain_name-0.6.20240107.gem
wget https://rubygems.org/downloads/em-websocket-0.5.3.gem
wget https://rubygems.org/downloads/netrc-0.11.0.gem
wget https://rubygems.org/downloads/racc-1.8.1.gem
wget https://rubygems.org/downloads/slack-notifier-2.4.0.gem
wget https://rubygems.org/downloads/thin-1.8.2.gem
wget https://rubygems.org/downloads/rest-client-2.1.0.gem
wget https://rubygems.org/downloads/xmlrpc-0.3.3.gem
wget https://rubygems.org/downloads/sqlite3-1.6.9.gem
wget https://rubygems.org/downloads/bundler-2.5.11.gem

![图片[6]-如何在Android手机的Termux-X FOR Kali NetHunter环境中安装BeEF-XSS并内网穿透-X黑手网](https://files.mdnice.com/user/122080/8ef1c30e-0dae-45c8-88fa-a5e96974ef69.png)
# 逐个安装 gem 包(注意安装顺序)
gem install --local --no-document ./bundler-2.5.11.gem
gem install --local --no-document ./racc-1.8.1.gem
gem install --local --no-document ./erubis-2.7.0.gem
gem install --local --no-document ./netrc-0.11.0.gem
gem install --local --no-document ./domain_name-0.6.20240107.gem
gem install --local --no-document ./em-websocket-0.5.3.gem
gem install --local --no-document ./slack-notifier-2.4.0.gem
gem install --local --no-document ./xmlrpc-0.3.3.gem
gem install --local --no-document ./rest-client-2.1.0.gem
gem install --local --no-document ./thin-1.8.2.gem
gem install --local --no-document ./sqlite3-1.6.9.gem
![图片[7]-如何在Android手机的Termux-X FOR Kali NetHunter环境中安装BeEF-XSS并内网穿透-X黑手网](https://files.mdnice.com/user/122080/6ba94464-04d0-4865-a790-17369acd1b0d.png)

第三步:克隆并编译安装 BeEF
# 克隆官方仓库到 /opt 目录
cd /opt
git clone https://github.com/beefproject/beef.git

# 进入 beef 目录
cd beef

bundle install
![图片[9]-如何在Android手机的Termux-X FOR Kali NetHunter环境中安装BeEF-XSS并内网穿透-X黑手网](https://files.mdnice.com/user/122080/57cd143e-469b-41c8-994e-e8dd439dc7ad.png)


![图片[12]-如何在Android手机的Termux-X FOR Kali NetHunter环境中安装BeEF-XSS并内网穿透-X黑手网](https://files.mdnice.com/user/122080/b28cdaaf-dbaf-4269-aa6b-8692f44c4d3f.png)
出现上图所示就是安装好了
第四步:修改 BeEF 配置文件
为确保 BeEF 正常启动,需正确配置认证信息。首先备份原始配置:
cp config.yaml config.yaml.backup
使用 nano 编辑配置文件:
nano config.yaml
关键修改项如下:
beef:
    credentials:
        user: "beef"
        passwd: "your_strong_password_here"  # 请替换为强密码

![图片[14]-如何在Android手机的Termux-X FOR Kali NetHunter环境中安装BeEF-XSS并内网穿透-X黑手网](https://files.mdnice.com/user/122080/a8a1a003-b890-43a9-9e34-cc65d55e6e80.png)
❝
⚠️ 注意:若密码包含特殊字符(如
@、$、#等),可能导致解析错误,引发启动失败。建议使用字母+数字组合的强密码,避免特殊符号。
如图所示, 不改密码会导致启动异常:

![图片[16]-如何在Android手机的Termux-X FOR Kali NetHunter环境中安装BeEF-XSS并内网穿透-X黑手网](https://files.mdnice.com/user/122080/74dc67a0-e39f-40b8-840f-774359bd333d.png)
第五步 启动 BeEF(前台运行)
./beef
或者后台运行
./beef &

第六步:访问 BeEF 控制台
在 NetHunter 终端中查看启动信息,获取访问 URL
通常访问地址为:http://127.0.0.1:3000/ui/panel

![图片[19]-如何在Android手机的Termux-X FOR Kali NetHunter环境中安装BeEF-XSS并内网穿透-X黑手网](https://files.mdnice.com/user/122080/82e37a19-5f49-4714-80fe-c2dfa940f28e.png)
使用配置文件中设置的用户名和密码登录

第七步内网穿透
这个网站注册个账号:

添加隧道:

下载对应的包,比如我是用的Nethunter,就下arm64

解压到你知道的目录,进入目录修改Frpc.ini 配置

进入目录修改Frpc.ini 配置,改为如图下面所示这个

再在当前目录复制命令启动

beef配置文件修改
#
# Copyright (c) 2006-2024 Wade Alcorn - wade@bindshell.net
# Browser Exploitation Framework (BeEF) - https://beefproject.com
# See the file 'doc/COPYING' for copying permission
#
# BeEF Configuration file

beef:
    version: '0.5.4.0'
    # More verbose messages (server-side)
    debug: false
    # More verbose messages (client-side)
    client_debug: false
    # Used for generating secure tokens
    crypto_default_value_length: 80

    # Credentials to authenticate in BeEF.
    # Used by both the RESTful API and the Admin interface
    credentials:
        user:   "beef"
        passwd: "xheishou.com"

    # Interface / IP restrictions
    restrictions:
        # subnet of IP addresses that can hook to the framework
        permitted_hooking_subnet: ["0.0.0.0/0", "::/0"]
        # subnet of IP addresses that can connect to the admin UI
        #permitted_ui_subnet: ["127.0.0.1/32", "::1/128"]
        permitted_ui_subnet: ["0.0.0.0/0", "::/0"]
        # subnet of IP addresses that cannot be hooked by the framework
        excluded_hooking_subnet: []
        # slow API calls to 1 every  api_attempt_delay  seconds
        api_attempt_delay: "0.05"

    # HTTP server
    http:
        debug: false #Thin::Logging.debug, very verbose. Prints also full exception stack trace.

        host: "0.0.0.0"
        port: "10004"

        # Decrease this setting to 1,000 (ms) if you want more responsiveness
        #  when sending modules and retrieving results.
        # NOTE: A poll timeout of less than 5,000 (ms) might impact performance
        #  when hooking lots of browsers (50+).
        # Enabling WebSockets is generally better (beef.websocket.enable)
        xhr_poll_timeout: 1000

        # Public Domain Name / Reverse Proxy / Port Forwarding
        #
        # In order for the client-side BeEF JavaScript hook to be able to connect to BeEF,
        # the hook JavaScript needs to be generated with the correct connect-back details.
        #
        # If you're using a public domain name, reverse proxy, or port forwarding you must
        # configure the public-facing connection details here.

        public:
            host: ""Frpc.ini 配置里的IP
            port: "61377"  改为你的穿透后的端口
            https: false
        # If using any reverse proxy you should also set allow_reverse_proxy to true below.
        # Note that this causes the BeEF server to trust the X-Forwarded-For HTTP header.
        # If the BeEF server is directly accessible, clients can spoof their connecting
        # IP address using this header to bypass the IP address permissions/exclusions.
        allow_reverse_proxy: true

        # Hook
        hook_file: "/hook.js"
        hook_session_name: "BEEFHOOK"

        # Allow one or multiple origins to access the RESTful API using CORS
        # For multiple origins use: "http://browserhacker.com, http://domain2.com"
        restful_api:
            allow_cors: false
            cors_allowed_domains: "http://browserhacker.com"

        # Prefer WebSockets over XHR-polling when possible.
        websocket:
            enable: false
            port: 61985 # WS: good success rate through proxies
            # Use encrypted 'WebSocketSecure'
            # NOTE: works only on HTTPS domains and with HTTPS support enabled in BeEF
            secure: true
            secure_port: 61986 # WSSecure
            ws_poll_timeout: 5000 # poll BeEF every x second, this affects how often the browser can have a command execute on it
            ws_connect_timeout: 500 # useful to help fingerprinting finish before establishing the WS channel

        # Imitate a specified web server (default root page, 404 default error page, 'Server' HTTP response header)
        web_server_imitation:
            enable: true
            type: "apache" # Supported: apache, iis, nginx
            hook_404: false # inject BeEF hook in HTTP 404 responses
            hook_root: false # inject BeEF hook in the server home page
        # Experimental HTTPS support for the hook / admin / all other Thin managed web services
        https:
            enable: false
            # In production environments, be sure to use a valid certificate signed for the value
            # used in beef.http.public (the domain name of the server where you run BeEF)
            key: "beef_key.pem"
            cert: "beef_cert.pem"

    database:
        file: "beef.db"

    # Autorun Rule Engine
    autorun:
        # this is used when rule chain_mode type is nested-forward, needed as command results are checked via setInterval
        # to ensure that we can wait for async command results. The timeout is needed to prevent infinite loops or eventually
        # continue execution regardless of results.
        # If you're chaining multiple async modules, and you expect them to complete in more than 5 seconds, increase the timeout.
        result_poll_interval: 300
        result_poll_timeout: 5000

        # If the modules doesn't return status/results and timeout exceeded, continue anyway with the chain.
        # This is useful to call modules (nested-forward chain mode) that are not returning their status/results.
        continue_after_timeout: true

    # Enables DNS lookups on zombie IP addresses
    dns_hostname_lookup: false

    # IP Geolocation
    geoip:
        enable: true
        # GeoLite2 City database created by MaxMind, available from https://www.maxmind.com
        database: '/usr/share/GeoIP/GeoLite2-City.mmdb'

    # You may override default extension configuration parameters here
    # Note: additional experimental extensions are available in the 'extensions' directory
    #       and can be enabled via their respective 'config.yaml' file
    extension:
        admin_ui:
            enable: true
            base_path: "/ui"
        demos:
            enable: true
        events:
            enable: true
        evasion:
            enable: false
        requester:
            enable: true
        proxy:
            enable: true
        network:
            enable: true
        metasploit:
            enable: false
        social_engineering:
            enable: false
        xssrays:
            enable: true

以下为自家搭建nps ,自己域名穿透
1.首先说tcp,端口穿透

这是我的配置文件
#
# Copyright (c) 2006-2024 Wade Alcorn - wade@bindshell.net
# Browser Exploitation Framework (BeEF) - https://beefproject.com
# See the file 'doc/COPYING' for copying permission
#
# BeEF Configuration file

beef:
    version: '0.5.4.0'
    # More verbose messages (server-side)
    debug: false
    # More verbose messages (client-side)
    client_debug: false
    # Used for generating secure tokens
    crypto_default_value_length: 80

    # Credentials to authenticate in BeEF.
    # Used by both the RESTful API and the Admin interface
    credentials:
        user:   "beef"
        passwd: "xheishou.com"

    # Interface / IP restrictions
    restrictions:
        # subnet of IP addresses that can hook to the framework
        permitted_hooking_subnet: ["0.0.0.0/0", "::/0"]
        # subnet of IP addresses that can connect to the admin UI
        #permitted_ui_subnet: ["127.0.0.1/32", "::1/128"]
        permitted_ui_subnet: ["0.0.0.0/0", "::/0"]
        # subnet of IP addresses that cannot be hooked by the framework
        excluded_hooking_subnet: []
        # slow API calls to 1 every  api_attempt_delay  seconds
        api_attempt_delay: "0.05"

    # HTTP server
    http:
        debug: false #Thin::Logging.debug, very verbose. Prints also full exception stack trace.

        host: "0.0.0.0"
        port: "10004"

        # Decrease this setting to 1,000 (ms) if you want more responsiveness
        #  when sending modules and retrieving results.
        # NOTE: A poll timeout of less than 5,000 (ms) might impact performance
        #  when hooking lots of browsers (50+).
        # Enabling WebSockets is generally better (beef.websocket.enable)
        xhr_poll_timeout: 1000

        # Public Domain Name / Reverse Proxy / Port Forwarding
        #
        # In order for the client-side BeEF JavaScript hook to be able to connect to BeEF,
        # the hook JavaScript needs to be generated with the correct connect-back details.
        #
        # If you're using a public domain name, reverse proxy, or port forwarding you must
        # configure the public-facing connection details here.

        public:
            host: "test.xheishou.top"
            port: "443"
            https: true
        # If using any reverse proxy you should also set allow_reverse_proxy to true below.
        # Note that this causes the BeEF server to trust the X-Forwarded-For HTTP header.
        # If the BeEF server is directly accessible, clients can spoof their connecting
        # IP address using this header to bypass the IP address permissions/exclusions.
        allow_reverse_proxy: true

        # Hook
        hook_file: "/hook.js"
        hook_session_name: "BEEFHOOK"

        # Allow one or multiple origins to access the RESTful API using CORS
        # For multiple origins use: "http://browserhacker.com, http://domain2.com"
        restful_api:
            allow_cors: false
            cors_allowed_domains: "http://browserhacker.com"

        # Prefer WebSockets over XHR-polling when possible.
        websocket:
            enable: false
            port: 61985 # WS: good success rate through proxies
            # Use encrypted 'WebSocketSecure'
            # NOTE: works only on HTTPS domains and with HTTPS support enabled in BeEF
            secure: true
            secure_port: 61986 # WSSecure
            ws_poll_timeout: 5000 # poll BeEF every x second, this affects how often the browser can have a command execute on it
            ws_connect_timeout: 500 # useful to help fingerprinting finish before establishing the WS channel

        # Imitate a specified web server (default root page, 404 default error page, 'Server' HTTP response header)
        web_server_imitation:
            enable: true
            type: "apache" # Supported: apache, iis, nginx
            hook_404: false # inject BeEF hook in HTTP 404 responses
            hook_root: false # inject BeEF hook in the server home page
        # Experimental HTTPS support for the hook / admin / all other Thin managed web services
        https:
            enable: false
            # In production environments, be sure to use a valid certificate signed for the value
            # used in beef.http.public (the domain name of the server where you run BeEF)
            key: "beef_key.pem"
            cert: "beef_cert.pem"

    database:
        file: "beef.db"

    # Autorun Rule Engine
    autorun:
        # this is used when rule chain_mode type is nested-forward, needed as command results are checked via setInterval
        # to ensure that we can wait for async command results. The timeout is needed to prevent infinite loops or eventually
        # continue execution regardless of results.
        # If you're chaining multiple async modules, and you expect them to complete in more than 5 seconds, increase the timeout.
        result_poll_interval: 300
        result_poll_timeout: 5000

        # If the modules doesn't return status/results and timeout exceeded, continue anyway with the chain.
        # This is useful to call modules (nested-forward chain mode) that are not returning their status/results.
        continue_after_timeout: true

    # Enables DNS lookups on zombie IP addresses
    dns_hostname_lookup: false

    # IP Geolocation
    geoip:
        enable: true
        # GeoLite2 City database created by MaxMind, available from https://www.maxmind.com
        database: '/usr/share/GeoIP/GeoLite2-City.mmdb'

    # You may override default extension configuration parameters here
    # Note: additional experimental extensions are available in the 'extensions' directory
    #       and can be enabled via their respective 'config.yaml' file
    extension:
        admin_ui:
            enable: true
            base_path: "/ui"
        demos:
            enable: true
        events:
            enable: true
        evasion:
            enable: false
        requester:
            enable: true
        proxy:
            enable: true
        network:
            enable: true
        metasploit:
            enable: false
        social_engineering:
            enable: false
        xssrays:
            enable: true
改成你服务器的 域名 哪儿 改成你服务器 IP 即可,端口改成你穿透的服务器端口

就可以启动了


2 .说下域名穿透
因为我的服务器用宝塔搭建了网站服务,所以我用宝塔为列子,首先你域名得先解析到你的服务器,
第一步:在 NPS 后台配置“域名解析”
不要使用之前的“TCP 隧道”,因为 TCP 隧道只能通过 IP:端口 访问。要使用域名,必须使用 NPS 的 “域名解析” (Host) 功能。如图配置

第二步:修改 BeEF 的 config.yaml
你需要告诉 BeEF,现在它的“外号”是你的域名,这样它生成的 JS 代码才会指向域名。
public:
            host: "你的域名.com"  # 换成你在 NPS 里填的那个域名
            port: "80"          # NPS 默认 HTTP 访问端口是 80
            https: false        # 如果你没在 NPS 配置证书,这里选 false
        allow_reverse_proxy: true
第三步:在宝塔面板配置站点
-
进入 宝塔面板 -> 网站 -> 添加站点。
-
域名填写:
test.xheishou.top。 -
PHP版本选择:
纯静态(因为我们只做转发)。 -
提交后,点击该站点的 设置 -> SSL,部署好你的证书(确保 Cloudflare “完全”模式能握手成功)。
第四步:配置反向代理(核心步骤)
这一步是将 Nginx 收到的 443 端口流量转发给本地的 NPS 或者是直接转发给隧道。
-
在站点设置窗口,点击左侧的 反向代理 -> 添加反向代理。
-
代理名称:随便填(如
beef)。 -
内容替换(非常重要):

第三步:修改 Nginx 配置文件防止 404/502
在宝塔的“反向代理”配置中,点击 配置文件,确保包含以下几行,特别是关于 WebSocket 的部分(防止管理后台断连):
# 彻底删除宝塔生成的原有内容,只留这段
location ^~ / {
    proxy_pass http://127.0.0.1:81;    # 对应你 nps.conf 里的 http_proxy_port
    proxy_set_header Host 127.0.0.1;   # 必须是 127.0.0.1 才能骗过 BeEF
    proxy_set_header X-Real-IP $remote_addr;
    proxy_set_header X-Forwarded-For $proxy_add_x_forwarded_for;

    # 必须关闭 Nginx 缓存,否则 hook.js 不更新
    proxy_buffering off;

    # 开启 WebSocket 支持
    proxy_http_version 1.1;
    proxy_set_header Upgrade $http_upgrade;
    proxy_set_header Connection "upgrade";
}
总结
现在的流量走向是: 浏览器 –(HTTPS:443)–> Cloudflare –(HTTPS:443)–> 宝塔Nginx –(HTTP代理)–> NPS隧道 –(内网)–> 本地Kali BeEF。
你在宝塔里配置完反向代理并重启 BeEF 后,现在访问 https://test.xheishou.top/hook.js 能看到代码了吗?


![图片[37]-如何在Android手机的Termux-X FOR Kali NetHunter环境中安装BeEF-XSS并内网穿透-X黑手网](https://files.mdnice.com/user/122080/f0310b5a-3f9a-4871-878e-ee2339db126d.png)
2、本站永久网址:https://www.xheishou.com
3、本网站的文章部分内容可能来源于网络,仅供大家学习与参考,如有侵权,请联系站长进行删除处理。
4、本站一切资源不代表本站立场,并不代表本站赞同其观点和对其真实性负责。
5、本站一律禁止以任何方式发布或转载任何违法的相关信息,访客发现请向站长举报
6、本站资源大多存储在云盘,如发现链接失效,请联系我们我们会第一时间更新。


暂无评论内容